ScanImage (resonant scanning only) allows to synchronize the sample clock of the NI FlexRIO digitizer module to be synchronized to an external clock (e.g. the laser sync clock). The frequency of the external sample rate has to be equal or smaller than the maximum specified sample rate of the digitizer module (5732: 80MHz, 5734: 120MHz). In doubt, verify the parameters of the clock with a high speed oscilloscope before connecting it to the digitizer.
To configure ScanImage for the use with an external clock the following settings need to be adjusted in the Machine Data File:
%% ResScan
externalSampleClock = true;
externalSampleClockRate = 80e6;
The parameter externalSampleClockRate is the nominal rate of the laser clock and is used within ScanImage as a first approximation to determine the scan parameters. To ensure maximum accuracy, ScanImage will validate the stability and exact rate of the laser clock on every start of an Acquisition. If ScanImage detects an unstable clock, it will report an error and abort the acquisition.
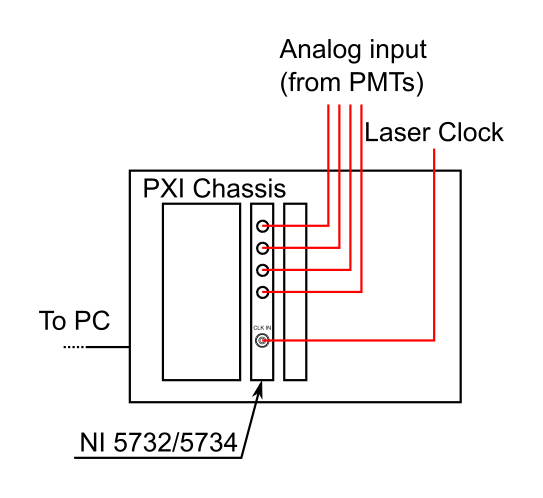
The Laser Clock is connected to the CLK IN SMB connector on the NI FlexRIO adapter module.
Laser Clock Signal Quality
The external clock connected to the NI digitizer module must comply to the parameters outlined in the NI5732/5734 user manual, page 36, section 'CLK IN'. If the fast photodiode output of the laser (laser clock output) does not fulfill these specifications, the signal needs to be filtered by an external circuit (e.g. a Schmitt trigger) before it can be connected to the digitizer input.
Alternatively, an external fast photodiode can be bused that fulfills the electrical specifications required by the NI digitizer module.

A noisy laser clock can cause the NI digitizer module to become unstable. An external circuit (e.g. a Schmitt Trigger) is required to clean the clock for use with ScanImage.
Sampling Phase Delay
Delays between the emission of the laser pulse and the registration of a sample clock by the digitizer lead to a phase shift between the laser pulse and the acquisition of the PMT signal. This phase shift depends on delays in the photodiode that generates the laser pulse clock, cable delays and ultimately on delays in the PMT and preamplifier.
While ScanImage 2015 supports the synchronization to an external laser clock, it cannot adjust for this phase delay in software so that an external circuit is needed to delay the sample clock.
 Various delays can lead to a phase offset between the sampling sweet spot and the actual sampling of the signal.
Anti-Aliasing Filter
By default, ScanImage enables a hardware Bessel filter to eliminate aliasing effects and to reduce high frequency interference (see NI 5732/5734 manual page 17,22). When syncing to a laser clock, it might be preferable to deactivate this filter in software. To change the filter settings of the FlexRIO digitizer module, choose from one of the two methods in the info panel. The property hSI.hResScan.channelsFilter accepts three possible values: 'none' 'bessel' 'elliptic'.
After starting ScanImage, enter the following command in the Matlab command window to deactivate the anti-aliasing filter:
>> hSI.hResScan.channelsFilter = 'none';

- In the ScanImage main window choose Settings > User Settings
- Click the v symbol in the right bottom corner to expand the window
- Locate the entry hSI.hResScan.channelsFilter and activate the checkbox to add it to the Current USR Properties
- Locate the setting hSI.hResScan.channelsFilter in the list 'Current USR Properties' and change the value to 'none'