ScanImage 2018 : ScanImage API

Introduction

ScanImage is fully scriptable using Matlab's command window and/or user defined functions. This article describes the ScanImage Application Programming Interface (API) and how to use it to automate ScanImage and extend ScanImage's functionality.

Icon

View the complete documentation of the ScanImage 2019 API

Table of content


ScanImage architecture

The ScanImage architecture is based on the Model-View-Controller design pattern. This architecture divides the software into three parts:

 DescriptionAccess Via
ModelApplication logic and hardware controlhSI
ViewGUI - display model statehSICtl
ControllerGUI - glue layer to manipulate modelhSICtl

This architecture ensures a strict separation between program logic and GUI. In principle, ScanImage can be run without a GUI. To get a better understanding of the concept, inspect the scanimage startup script. In the Matlab command window, type

Inspect the ScanImage startup script
>> edit scanimage

Find the following section in the startup script:

scanimage startup script excerpt
		try
            hSI = scanimage.SI(mdf);
            hSI.initialize();
            
            hSICtl = scanimage.SIController(hSI);
            hSICtl.initialize(usr);
            assignin('base','hSI',hSI);
            assignin('base','hSICtl',hSI.hController{1});
		catch ME
			...

Note that two objects are created: hSI and hSICtl; hSI is the ScanImage model and contains all program logic to control the microscope hardware, acquire frames and log data. Once the model is started and initialized, the GUI (hSICtl) is launched and initialized. Finally, both object handles are assigned in the base workspace to give the user direct access to ScanImage via the Matlab command window.

When a control in the GUI is changed, the controller manipulates the model accordingly. When the state of the model changes, the controller's event listeners notice the change and update the GUI. However, the model can be manipulated and queried directly by the user as well. As a first example, type the following command into the Matlab command window:

Access ScanImage from the Matlab command prompt
>> hSI.acqState
ans =
idle

This command returns the current acquisition state of ScanImage. Next type:

Access ScanImage from the Matlab command prompt
>> hSI.hRoiManager.scanZoomFactor = 10;

Note that the appropriate control in the GUI is updated accordingly.
ScanImage API

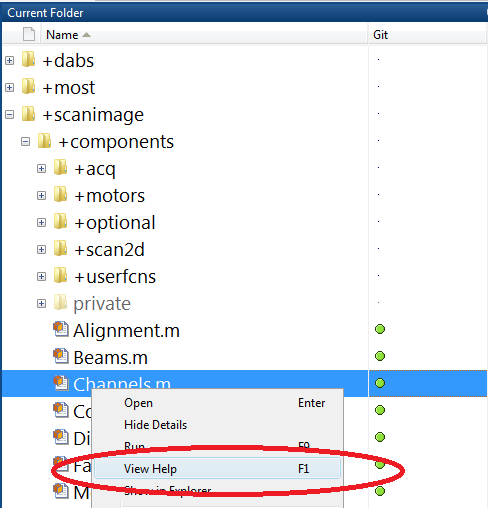
ScanImage is organized in multiple components (stored in the folder scanimage\components) that are managed by the class +scanimage\SI.m. To access the documentation for a component, locate the component in the Matlab file overview and press 'F1'. This will launch the Matlab help that gives an overview of all publicly accessible properties and methods of the component.

Icon

If you have questions about the ScanImage API, a specific method or property, or how to perform a specific task in ScanImage using the API, please create a support ticket at support.vidriotech.com or contact us at support@vidriotech.com.


The following example illustrates an automated ScanImage acquisition:

  • move the stage to a desired position
  • determine the path for saving the acquired data
  • set the zoom factor
  • set the number of frames to acquire
  • start the acquisition

Automated Grab
function automatedGrab()
	% example for using the ScanImage API to set up a grab
	hSI = evalin('base','hSI'); 			% get hSI from the base workspace
	assert(strcmpi(hSI.acqState,'idle'));   % make sure scanimage is in an idle state
 
	hSI.hMotors.motorPosition = [0 0 0]; 	% move stage to origin Note: depending on motor this value is a 1x3 OR 1x4 matrix
	hSI.hScan2D.logFilePath = 'C:\'; 		% set the folder for logging Tiff files
	hSI.hScan2D.logFileStem = 'myfile';		% set the base file name for the Tiff file
	hSI.hScan2D.logFileCounter = 1;  		% set the current Tiff file number
	hSI.hChannels.loggingEnable = true;     % enable logging
	hSI.hRoiManager.scanZoomFactor = 2;		% define the zoom factor
	hSI.hStackManager.framesPerSlice = 100; 	% set number of frames to capture in one Grab
 
	hSI.startGrab();						% start the grab
end
Accessing the API help


Accessing a component's help within Matlab.

User Functions

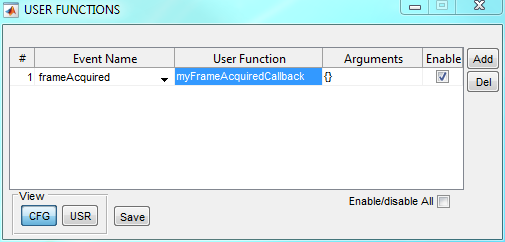
ScanImage allows to execute User Functions at pre-defined ScanImage events. This helps to adapt ScanImage to the specific needs of the user. The example below shows a function that is configured to be executed on every new acquired frame. The function uses the ScanImage API to retrieve the frame. Further processing could be done to extract features in the image and control hardware (e.g. execute a stimulus or send a trigger)

Frame Acquired Callback
function myFrameAcquiredCallback(src,evt,varargin)
	hSI = src.hSI; % get the handle to the ScanImage model
 
	% scanimage stores image data in a data structure called 'stripeData'
	% this example illustrates how to extract an acquired frame from this structure
	lastStripe = hSI.hDisplay.stripeDataBuffer{hSI.hDisplay.stripeDataBufferPointer}; % get the pointer to the last acquired stripeData
	channels = lastStripe.roiData{1}.channels; % get the channel numbers stored in stripeData
	
	for idx = 1:length(channels)
		frame{idx} = lastStripe.roiData{1}.imageData{idx}{1}; % extract all channels
	end
 
	% the last frame for all channels stored in the cell array 'frame'
	% now we can go on to process the data...
end
Icon

The default ScanImage image format is in row-major order, while Matlab uses column-major order for images. To display ScanImage frames in Matlab, they need to be transposed first.

Defining a user function for the event 'frameAcquired'

Attachments: